Powered by Blogger.
Latest Post

15 Ways to Drive more traffic to Your Blog

Written By dcscs on Thursday, 14 November 2013 | 21:31


There are many different factors that make blogs much better than other Web Pages, including the speed at which blogs are indexed, the ability to submit to blog directories & normal directories, pings and track backs. All these things help drive more traffic to blogs. Here are 15 popular techniques you can use to drive more traffic to your blog:


Publish short posts frequently
Using your main keywords, publish as much short posts as you can on a daily bases. Short posts don’t take much time to write, but they are very popular amongst blog readers. Publishing few short posts a day, will keep your blog within the radar of search engines for longer, giving your blog more visibility.


Submit to My Yahoo
When you submit your own RSS to My Yahoo it is automatically indexed by Yahoo.

Submit to Google’s reader
When you submit your own blog RSS to Google’s Reader the Google Blog Search will index your site for you.

Trade links
Add a link directory to your blog and trade links like as often as possible. Although it may take a little more time than simply submitting to a search engine one time, this method is one of the best ways to drive traffic to your site.

Ping your posts
Use ping sites like ping-o-matic. Ping your site each and every time you add a new post.

Comment on other blogs
Do not just leave short comments like “I agree.” Leave well thought out replies that will force readers to wonder who wrote that and take more interest in YOUR blog.

Submit to directories
Submit your blog to traditional directories such as DMOZ. Directories increase relevance with Google. DMOZ is very picky, but you have nothing to lose by trying.

Submit RSS
Submit to as many RSS Directories and Search Engines as possible. This is an easy process that can give you a lot of visibility.

Submit to search engines
Submit your blog to traditional search engines such as AltaVista, and MSN.

Use track backs
If there is a blog that you refer to or quote and it is highly relevant to your subject, leave a track back. It increases your link popularity and you may even gain a few interested readers from the linked site.

Go offline
Use newspaper ads, public bulletin boards, or business cards to let as many people as possible know that your blog exists.

Link from your email
Ad a link to your blog in your e-mail signature block.

Use Groups
Find a relevant group on Google groups, Yahoo groups, MSN groups or any of the thousands of other FREE group services and find like minded people and talk with them. Make sure your use your blog URL like it is your name.

Use Forums
Forums are one of the best places to go for advice. Go to forums and find problems to solve. Make sure you leave your blog name, but be tactful about it; some forums get annoyed with those who selfishly drop a few links to their own site and leave.

Tag your blog
Tagging is a new idea that has erupted across the web. Sites like Del.icio.us, Technorati and many others have a social feature that allows you to place your article under keywords or “tags” that everyone interested in that tag can see.


Although these are some of the most popular ways to drive traffic to your blog, do not limit yourself to tips and lists. Use your imagination and you will come up with many many more ways to drive traffic to your blog!

Hide/Show Widgets/Gadgets In Home/Post/Static/Archive Pages In Blogger

As some of you may have noticed, all the widgets/gadgets you add to your blog, will be displayed on all the pages by default, including the homepage as well. And I'm sure very few know that AdSense could disable your account in case you've put ad units inside the content of your contact or privacy policy pages. Therefore, hiding certain elements inside your blog pages is not only a matter of design, but it is also a requirement.

To hide (or show) widgets in particular posts, static pages, homepage or archive pages, you can use conditional tags.

Step 1. Go to Blogger's Dashboard > Layout and name the HTML/Javascript gadgets that you have already added. Doing this, it will be easier for you to identify the widgets that you have in your Blogger's template. Give it a unique title so that it does not match with any of the titles of any other widgets already added.

Step 2. Next thing to do is to go to Template and click on Edit HTML


Step 3. Select the "Expand Widget Templates" checkbox.


Step 4. Find the widget's title in the HTML by using Ctrl+F and entering the widget's name in the search box.
Let's say that the title for one of my widgets is "Recent Posts". After searching for the widget's name, I will find a similar code in my template:


<b:widget id='HTML1' locked='false' title='Recent Posts' type='HTML'><b:includable id='main'><!-- only display title if it's non-empty --><b:if cond='data:title != ""'><h2 class='title'><data:title/></h2></b:if><div class='widget-content'><data:content/></div>
<b:include name='quickedit'/></b:includable></b:widget>  


This code represents the widget/gadget that I have added in the Page Elements location (Layout).

Step 5. After you've found your widget's code, add the following conditional tags marked with red just below and above to hide the widget from specific pages or posts in Blogger. For instance, in case you want:


To show the widget only in Homepage:
<b:widget id='HTML1' locked='false' title='Recent Posts' type='HTML'><b:includable id='main'><b:if cond='data:blog.url == data:blog.homepageUrl'><!-- only display title if it's non-empty --><b:if cond='data:title != ""'><h2 class='title'><data:title/></h2></b:if><div class='widget-content'><data:content/></div>
<b:include name='quickedit'/></b:if></b:includable></b:widget> 

To show Blogger widget only in post pages
<b:widget id='HTML1' locked='false' title='Recent Posts' type='HTML'><b:includable id='main'><b:if cond='data:blog.pageType == "item"'><!-- only display title if it's non-empty --><b:if cond='data:title != ""'><h2 class='title'><data:title/></h2></b:if><div class='widget-content'><data:content/></div>
<b:include name='quickedit'/></b:if></b:includable></b:widget> 


To show the widget in a specific page
<b:widget id='HTML1' locked='false' title='Recent Posts' type='HTML'><b:includable id='main'><b:if cond='data:blog.url == "URL of the page"'><!-- only display title if it's non-empty --><b:if cond='data:title != ""'><h2 class='title'><data:title/></h2></b:if><div class='widget-content'><data:content/></div>
<b:include name='quickedit'/></b:if></b:includable></b:widget> 


Note: Replace URL of the page with the address of the page in which you want the widget to appear

To hide a widget only in a particular page
<b:widget id='HTML1' locked='false' title='Recent Posts' type='HTML'><b:includable id='main'><b:if cond='data:blog.url != "URL of the page"'><!-- only display title if it's non-empty --><b:if cond='data:title != ""'><h2 class='title'><data:title/></h2></b:if><div class='widget-content'><data:content/></div>
<b:include name='quickedit'/></b:if></b:includable></b:widget>  

 To show widgets only in static pages
 <b:widget id='HTML1' locked='false' title='Recent Posts' type='HTML'><b:includable id='main'><b:if cond='data:blog.pageType == "static_page"'><!-- only display title if it's non-empty --><b:if cond='data:title != ""'><h2 class='title'><data:title/></h2></b:if><div class='widget-content'><data:content/></div>
<b:include name='quickedit'/></b:if></b:includable></b:widget> 


To hide widgets in Static Pages
<b:widget id='HTML1' locked='false' title='Recent Posts' type='HTML'><b:includable id='main'><b:if cond='data:blog.pageType != "static_page"'><!-- only display title if it's non-empty --><b:if cond='data:title != ""'><h2 class='title'><data:title/></h2></b:if><div class='widget-content'><data:content/></div>
<b:include name='quickedit'/></b:if></b:includable></b:widget> 


To show widgets only in Archive Pages
<b:widget id='HTML1' locked='false' title='Recent Posts' type='HTML'><b:includable id='main'><b:if cond='data:blog.pageType == "archive"'><!-- only display title if it's non-empty --><b:if cond='data:title != ""'><h2 class='title'><data:title/></h2></b:if><div class='widget-content'><data:content/></div>
<b:include name='quickedit'/></b:if></b:includable></b:widget>  

Step 6. After you have added the conditional tags, Save Template and view your blog.

That's it! 

How To Remove Blogger Picture/Image Shadow And Border

If you are using the old Blogger interface:
  • Go to Dashboard - Design - Template Designer - Advanced - Add CSS - paste the following code - Press enter after the last character of the last line } - Apply to Blog.

If you are using the new Blogger interface:
  • Go to Dashboard - Template - Customize - Advanced - Add CSS - paste the following code - Press enter after the last character of the last line } - Apply to Blog.

.post-body img, .post-body .tr-caption-container, .Profile img, .Image img,.BlogList .item-thumbnail img {  padding: none !important;  border: none !important;  background: none !important;  -moz-box-shadow: 0px 0px 0px transparent !important;  -webkit-box-shadow: 0px 0px 0px transparent !important;  box-shadow: 0px 0px 0px transparent !important;

Now your blogger images should appear without any border or shadow. Cheers!

Update:

If the above method doesn't work for you, do the following:

- Go to Blogger's Dashboard > Design (Layout) > Edit HTML
- Thick the "Expand widget templates" checkbox;
- Search (CTRL + F) for the following code:


border: 1px solid $(image.border.color);
  -moz-box-shadow: 1px 1px 5px rgba(0, 0, 0, .1);  -webkit-box-shadow: 1px 1px 5px rgba(0, 0, 0, .1);  box-shadow: 1px 1px 5px rgba(0, 0, 0, .1); 

- Delete it and Save your template.

Create A Rollover Image Effect (Change Image On Mouseover)

The Rollover effect is one in which an image web object changes (swaps itself) on mouse over to another web object (called rollovers) and reverts back to the original image on mouse out. Rollover images are preloaded into the page when it is loading, this ensures that the rollovers are displayed quickly. The onMouseOver and onMouseOut attributes of the link tag are used to make this functional.


Making Rollover Effect Image

You have the following code:

 <a href="URL ADDRESS"><img src="URL OF THE FIRST IMAGE GOES HERE" onmouseover="this.src='URL OF THE SECOND IMAGE GOES HERE'" onmouseout="this.src='URL OF THE FIRST IMAGE GOES HERE'" /></a>

Change the colored texts as it follows:

1. URL ADDRESS

This is the address where somebody will be sent when clicks on the image.
Example, my blog address: http://4bloggingtips.blogspot.com/
2. URL OF THE FIRST IMAGE GOES HERE

Replace the orange text (two times) with the URL address of the image which will appear before you hover over it.

3. URL OF THE SECOND IMAGE GOES HERE
Replace the text in blue with the url of  the image that will appear when the cursor hovers over it.

Now you can paste your image inside a blog gadget, going to Layout > click on Add a Gadget link (right side) > Select HTML/JavaScript from the pop-up window, then add it to your sidebar.

You can also add it inside your post by going to New Post > Switch to HTML tab and then paste the code in the empty box.

That's it. Enjoy ;)

How to Open Adf.ly Links in India and Other Blocked Countries

Written By dcscs on Tuesday, 8 October 2013 | 07:44

As We all know that adf.ly is a site from where you get paid a little amount of money when someone visited your link. It has became so popular that many people are using this site as a side income.

But now a days this site is blocked in India and few other countries, so when some one clicks on a adf.ly link form India or other blocked countries, he/she will see a BLOCK notice. Many people are facing this problem but you can surely Bypass this problem.
Just follow the simple steps.

If you want to go to any adf.ly link and you are blocked (like: adf.ly/xyz).
Just simply put v2 before adf.ly ( like: v2.adf.ly/xyz).

Now go to the link v2adf.ly/xyz to continue.

If the above process is not working, then try this out.

your old link: http://adf.ly/xyz
Just a "s" after http
Your New Link: https://adf.ly/xyz

You now can easily continue.

Change Your Old Facebook Look into New one

Written By dcscs on Saturday, 5 October 2013 | 20:27

What is New Facebook Skin:(Scroll Down for Video Help)

Facebook Have Changed their looks recently in 2013. You now can get rid of that boring FB skin. Though the color remains Blue but they have made some changes in the new skin.

How to get it:
Follow the steps to get your new Skin.

Step 1: Go to : https://www.facebook.com/about/newsfeed and scroll down to the bottom.

Step 2: Click on "Try the new look" button.


Step 3: Now follow some instructions and you are ready to go.

Google Official Contact Form for Static Pages in Blogger

Written By dcscs on Sunday, 29 September 2013 | 21:56

Blogger released it's brand new Contact Form Widget for Blogger Users .It helps to send e-mails to blog owner without Sign In to Google or any other account. Anyone can send mails by providing a valid e-mail address and Message. But there is a problem with that Widget. We posted an article about "How to add Blogger Official Contact Form?" It only works as a Widget (it occupies in Sidebar / Footer), it can place in Static Pages. In many popular websites/blogs they use a page for Contact Form. By default this Contact Form can only used as widget, we are introducing a technique to use Google Official contact Form on Blogger Static Pages.


Add Blogger Official Contact Form to Static Pages

             Step 1:    Sign In to Blogger Dashboard
  
             Step 2: Select Pages -> Create Blank Page


          Step 3:  Switch to HTML mode from Compose Mode.
          
          Step 4: Click on HTML in left top of the Page

          Step 5:  Copy the Following code inside it and Save
<table><tbody>
<tr><td>Name</td> <td>
<input class="contact-form-name" id="ContactForm1_contact-form-name" name="name" size="30" type="text" value="" />
</td></tr>
<tr> <td>
Email<span style="font-weight: bolder;">*Mandatory</span></td><td>
<input class="contact-form-email" id="ContactForm1_contact-form-email" name="email" size="30" type="text" value="" />
</td></tr>
<tr> <td>
Message<span style="font-weight: bolder;">*Mandatory</span></td><td>
<textarea class="contact-form-email-message" cols="25" id="ContactForm1_contact-form-email-message" name="email-message" rows="5"></textarea>
</td></tr>
<tr><td align="center" colspan="2">
<input class="contact-form-button contact-form-button-submit" id="ContactForm1_contact-form-submit" type="button" value="Send" />
</td></tr>
<tr><td align="center" colspan="2">
<div style="max-width: 222px; text-align: center; width: 100%;">
<div class="contact-form-error-message" id="ContactForm1_contact-form-error-message">
</div>
<div class="contact-form-success-message" id="ContactForm1_contact-form-success-message">
</div>
</div>
</td></tr>
</tbody></table>


         Step 6:   Go to Template -> Edit HTML
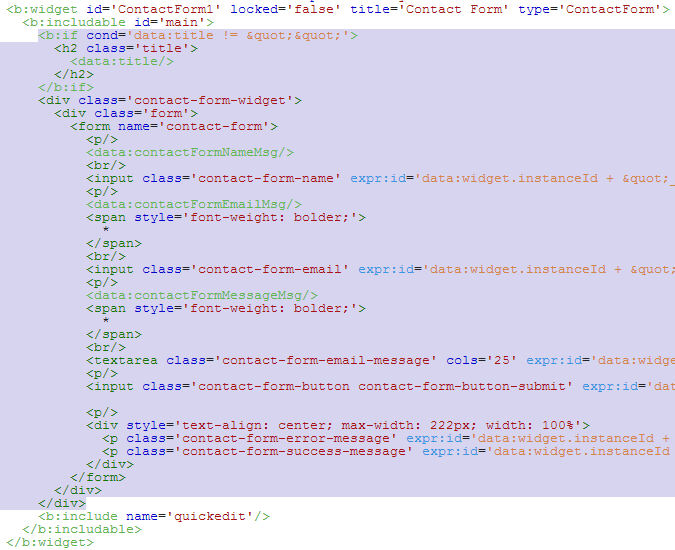
         Step 7: Click on Jump to Widget and take Contact Form1


       Step 8: Click on the arrow before <b:widget id='ContactForm1' locked='false' title=' Contact Us' type='ContactForm'>


       Step 9: Delete the portion inside <b:includable id='main'> ........ </b:includable>


           Step 10: Now Sidebar Widget will not appear.
           Step 11: Click on Save


Add Google Official Contact Form Widget to Blogger?

Contact Form Widget is used to send mails to the Blog owner from the visitors/users. Do your blog looks anything missing?. I think a Contact Form is an important widget that was missed for long time. Are you using Contact From in your blog? If so, it will not Google's Official contact Form. That may be from other hosted providers. Here Google released its brand new Contact Form Widget for Blogger Users. It helps to send e-mails to blog owner without Sign In to Google or any other account. Anyone can send mails by providing a valid e-mail address and Message. This Contact Form can add to any blogger blogs that hosted in Google's Server.


 It have three Fields- Name,e-mail and Message and a Send Button. E-mail and Message field are mandatory. It also have e-mail validation, checks whether the e-mail address provided is valid or not. And a notice or message will appear to show the status of sending e-mail, Shows success message it it delivered to user,otherwise shows error message.  There is no CAPTCHA (Used to prevent Spam) in the Contact Form, but Google implemented its effective Spam detection mechanisms. The problem exist with the Contact Form is it can only use as Widget (in Sidebar or  Footer or Under Posts). In many popular websites/blogs they use a page for Contact Form. By default this Contact Form can used as widget, we introduce a technique to use Google Official contact Form on Blogger Static Pages

Advantages

  •     Send e-mails to Blog owner without Sign In to any Accounts.
  •     E-mail validation is provided.
  •     Spam detection Mechanism.
  •     Show status message of sending.
 

Disadvantages

  • Use only as Widget (in Sidebar/ in Footer)
  • No CAPTCHA

How to Add:


   Step 1:  Sign In to Blogger Dashboard

   Step 2:  Select Layout -> Click on Add a Gadget

   Step 3:  Select More Gadgets in Left Side and Select Contact Form            

   Step 4:Give the Title and Click Save


 You have done please check your blog.

When visitor drop a message it goes straight to your inbox. One copy of the message will send to each Admin.

Awsome Multi-Colored Popular Posts Widget for Blogger powered CSS3

Written By dcscs on Tuesday, 17 September 2013 | 00:32

Popular Posts Widget is a Widget providing by Blogger and we can add it to our Blog. This Widget displays the Most Viewed posts of your blog that maybe of month or in week or All the time. You can select how Popular posts are to be displayed. By default it shows an image(if the post has any) and Title of Post followed by the content of post wrapped by 20-25 words. This article is a tutorial to Style that Popular posts Widget to an Awesome Multi-Colored Popular posts Widget.


Click on the Link to see the Preview of this Post => See


How to do :

Step 1: Sign in to your Blogger Account and Add Popular Post Widget to Blogger.

            Go to  Layout ->  Select  "Add a Gadget" and take  Popular Posts Widget from the Widget List.

Step 2: Go to Template ->  Edit HTML, Find ]]></b:skin> by pressing Ctrl+F

Step 3: Copy the following code and Paste it Just above it

<!-- Popular posts multi colored UI theme -->
#PopularPosts1 ul{margin:0;padding:5px 0;list-style-type:none}
#PopularPosts1 ul li{position:relative;margin:5px 0;border:0;padding:10px}
#PopularPosts1 ul li:first-child{background:#ff4c54;width:97%}
#PopularPosts1 ul li:first-child:after{content:"1"}
#PopularPosts1 ul li:first-child + li{background:#ff764c;width:87%}
#PopularPosts1 ul li:first-child + li:after{content:"2"}
#PopularPosts1 ul li:first-child + li + li{background:#ffde4c;width:84%}
#PopularPosts1 ul li:first-child + li + li:after{content:"3"}
#PopularPosts1 ul li:first-child + li + li + li{background:#c7f25f;width:81%}
#PopularPosts1 ul li:first-child + li + li + li:after{content:"4"}
#PopularPosts1 ul li:first-child + li + li + li + li{background:#33c9f7;width:78%}
#PopularPosts1 ul li:first-child + li + li + li + li:after{content:"5"}
#PopularPosts1 ul li:first-child + li + li + li + li +li{background:#7ee3c7;width:75%}
#PopularPosts1 ul li:first-child + li + li + li + li + li:after{content:"6"}
#PopularPosts1 ul li:first-child + li + li + li + li + li +li{background:#f6993d;width:72%}
#PopularPosts1 ul li:first-child + li + li + li + li + li + li:after{content:"7"}
#PopularPosts1 ul li:first-child + li + li + li + li + li + li +li{background:#f59095;width:69%}
#PopularPosts1 ul li:first-child + li + li + li + li + li + li + li:after{content:"8"}
#PopularPosts1 ul li:first-child + li + li + li + li + li + li + li +li{background:#c7f25f;width:66%}
#PopularPosts1 ul li:first-child + li + li + li + li + li + li + li + li:after{content:"9"}
#PopularPosts1 ul li:first-child:after,
#PopularPosts1 ul li:first-child + li:after,
#PopularPosts1 ul li:first-child + li + li:after,
#PopularPosts1 ul li:first-child + li + li + li:after,
#PopularPosts1 ul li:first-child + li + li + li + li:after,
#PopularPosts1 ul li:first-child + li + li + li + li + li:after,
#PopularPosts1 ul li:first-child + li + li + li + li + li + li:after,
#PopularPosts1 ul li:first-child + li + li + li + li + li + li + li:after,
#PopularPosts1 ul li:first-child + li + li + li + li + li + li + li + li:after{position:absolute;top:20px;right:-15px;border-radius:50%;background:#353535;width:30px;height:30px;text-align:center;font-size:28px;color:#fff}
#PopularPosts1 ul li .item-thumbnail{float:left;border:0;margin-right:10px;background:transparent;padding:0;width:70px;height:70px;}
#PopularPosts1 ul li a{font-size:13px;color:#444;text-decoration:none}
#PopularPosts1 ul li a:hover{color:#222;text-decoration:none}
#PopularPosts1 img{
-moz-border-radius: 130px;
-webkit-border-radius: 130px;
border-radius: 130px;
-webkit-transition: all 0.3s ease;
-moz-transition: all 0.3s ease;
transition: all 0.3s ease;
padding:4px;
border:1px solid #fff !important;
}
#PopularPosts1 img:hover {
border-radius: 0 0 0 0;
-moz-transform: scale(1.2) rotate(-711deg) ;
-webkit-transform: scale(1.2) rotate(-711deg) ;
-o-transform: scale(1.2) rotate(-711deg) ;
-ms-transform: scale(1.2) rotate(-711deg) ;
transform: scale(1.2) rotate(-711deg) ;
}
<!-- popular posts multicolored UI theme -->

Step 4: Click on Preview Template.

Step 5: Save The Template and you are Done.

Making A Gadget Visible Only To The Blog Administator

Written By dcscs on Saturday, 14 September 2013 | 20:44

Now the post title says it all. There are gadgets that sometimes we want to be visible only to us and not to other people.
The procedure is simple, we just have to add two lines to our gadget that we want to hide.


How to do:

Step 1: Go to Template > Edit HTML and then search for the gadget's code we want to hide by clicking  Ctrl + F.

As an example in a HTML/JavaScript gadget,we will see a code like this:

<b:widget id='HTML1' locked='false' title='' type='HTML'>
<b:includable id='main'>
<span class='item-control blog-admin'>
<!-- only display title if it's non-empty -->
<b:if cond='data:title != &quot;&quot;'>
<h2 class='title'><data:title/></h2>
</b:if>
<div class='widget-content'>
<data:content/>
</div>

<b:include name='quickedit'/>
</span>
</b:includable>
</b:widget>
 Now all you have to do is add the parts in RED and ready to go. If you close the session go to your blog you'll not be able to view the gadget that you have hidden, but as soon as you sign in you will see that it is visible to you.

Not all gadgets have the same structure like in this example, but it will be easier to guide you, just place the first code in the red just after <b:includable id='main'>

And the second red code just before  </b:includable>

Note: To look inside the widget's code, click on the sideways arrow next to the widget's id.

And with that the gadget will be hidden for readers except you. 

Simple Recent Posts Widget for Blogger/Blogspot

Written By dcscs on Sunday, 8 September 2013 | 22:49

The main advantage on this Recent Posts widget is that it will show not only post title but also post excerpts or snippets and it's easy to customize/apply different style on it. To style it into your own design, you just have to modify the CSS style.


What are the facilities:

       
         1.display post title only
         2.change the number of posts
         3.change the number of characters of the post snippet/excerpt.
         4.show the post dates

How to do it:

Step 1: Log in to your Blogger account and go to Dashboard, click on Layout and then click on Add a Gadget .


Step 2: A pop-up window will open, scroll down and choose HTML/JavaScript from there.


Step 3: Select & Copy the code from one of the options below and paste it into new HTML/JavaScript.

option 1: Recent posts widget with snippets

<div id="hlrpsa">
<script src="http://helplogger.googlecode.com/svn/trunk/recent-posts-with-snippets.js">
</script>
<script>
var numposts = 5;var showpostdate = false;var showpostsummary = true;var numchars = 100;var standardstyling = true;
</script>
<script src="http://your-blog.blogspot.com/feeds/posts/default?orderby=published&amp;alt=json-in-script&amp;callback=showrecentposts">
</script></div>
<div id="rpdr" style="font-family: arial, sans-serif; font-size: 9px;">
<a href="http://helplogger.blogspot.com/2012/04/recent-posts-widget-for-bloggerblogspot.html" target="_blank" title="Grab this Recent Posts Widget">Recent Posts Widget</a> by <a href="http://helplogger.blogspot.com" title="Recent Posts Widget">Helplogger</a></div>
<noscript>Your browser does not support JavaScript!</noscript>
<style type="text/css">
#hlrpsa a {color: #0B3861; font-size: 13px;} #rpdr {background: url(https://blogger.googleusercontent.com/img/b/R29vZ2xl/AVvXsEgNQaxQ61ht-nXDIvdVbhJm8cBV18kJvWGjGItd4ljW_SHiZq_y3vAu_zUFDV9bJrp9Dy03fTrgRFGpzCUGhbjEsEZcfnkpSW1F6FcLViYBRph5X2ScrmPLVG1jul4s8lz2v3zrqM5PrqYY/s1600/blogger.png) 0px 0px no-repeat; padding: 1px 0px 0px 19px; height:14px; margin: 5px 0px 0px 0px;line-height:14px;}
#rpdr, #rpdr a {color:#808080;}
#hlrpsa { color: #999999; font-size: 11px; border-bottom:1px #cccccc dotted; margin-top:-10px; padding-bottom:10px;}
.hlrps a {font-weight:bold; }
.hlrpssumm {}
</style>


Option 2: Recent Posts Widget Showing Post Titles Only 

 <div id="hlrpsb">
<script style="text/javascript" src="http://helplogger.googlecode.com/svn/trunk/recent-posts-with-titles-only.js"></script>
<script style="text/javascript">var numposts = 10;var showpostdate = false;var showpostsummary = false;var numchars = 100;var standardstyling = true;</script>
<script src="http://your-blog.blogspot.com/feeds/posts/default?orderby=published&alt=json-in-script&callback=showrecentposts"></script></div>
<div style="font-family: arial, sans-serif; font-size: 9px;" id="rpdr"><a href="http://helplogger.blogspot.com/2012/04/recent-posts-widget-for-bloggerblogspot.html" title="Grab this Recent Posts Widget" target="_blank">Recent Posts Widget</a> by <a href="http://helplogger.blogspot.com" title="Recent Posts Widget">Helplogger</a></div><noscript>Oops! Make sure JavaScript is enabled in your browser.</noscript>
<style type=text/css>
#hlrpsb a {color: #0B3861; font-size: 13px;} #rpdr {background: url( https://blogger.googleusercontent.com/img/b/R29vZ2xl/AVvXsEgNQaxQ61ht-nXDIvdVbhJm8cBV18kJvWGjGItd4ljW_SHiZq_y3vAu_zUFDV9bJrp9Dy03fTrgRFGpzCUGhbjEsEZcfnkpSW1F6FcLViYBRph5X2ScrmPLVG1jul4s8lz2v3zrqM5PrqYY/s1600/blogger.png ) 0px 0px no-repeat; padding: 1px 0px 0px 19px; height:14px; margin: 5px 0px 0px 0px;line-height:14px;}
#rpdr, #rpdr a {color:#808080;}
.bbrecpost2 {
padding-top:6px;
padding-bottom:6px;
border-bottom: 1px #cccccc dotted; }
</style> 


Step 4: 

        1.Change 5 (option 1) and 10 (option 2) with the number of posts you want to display. 
        2.Change false to true if you want the posts dates to appear. 
        3.Change 100 (option 1) if you want more characters to be displayed.
        4.To change the color and front size of the links, modify the values in blue (links) and violet (front size)
        5.To change the style of the posts summary, modify the values in green (color) and orange (front size) 
        6.Replace the your-blog text with the name of your blog or if you have a custom domain change all the bolded line with address link in this example: 
http://www.your-site.com/feeds/posts/default....

Step 5: Save your widget and you are ready now.

Fade In/Out Page Loading Effect On Blogger Posts

Written By dcscs on Monday, 2 September 2013 | 00:24

A very common effect in jQuery is the fade effect that hide or shows an element by fading it, we can use it in many ways


How to use The Fade in Loading Effect:

Step 1: To put this fading effect on your blog, go to your Template > Edit HTML


Step 2: Click anywhere inside the code area and search for the </head> tag using CTRL + F keys:


Step 3: Then just above </head> add the following code:

<script src='http://ajax.googleapis.com/ajax/libs/jquery/1.8.2/jquery.min.js' type='text/javascript'/>
<script type='text/javascript'>
//<![CDATA[
$(document).ready(function() {
$("body").css("z-index", "-10");
$("body").fadeIn(0);

$("a").click(function(event){
event.preventDefault();
linkLocation = this.href;
$("body").fadeOut(500, redirectPage); });
function redirectPage() {
window.location = linkLocation;
}
});
//]]>
</script>
<style>
html {
background-color: #F2F2F2; /* Color fading */
}
</style>


Step 4: Save the changes and here you go. In RED you can see where to change the color that fades on a loading page. 

The original script hides the body of the page while loading, I prefer to change that property with a  negative, z-index to avoid problems with the search engine robots that may effect the positioning.

Featured Posts

Most Read

Catagory

 
Support : Creating Website | Johny Template | Mas Template
Copyright © 2013. 4 Blogging Tips - All Rights Reserved
Template Created by Creating Website Published by Mas Template
Proudly powered by Blogger